To V-carve a sign with a CNC router, you type or draw the letters, choose a V-bit (60° or 90° for most signs), let the software compute a toolpath whose depth follows the width of each stroke, set the Z zero exactly on top of the board, and carve. Then you fill the letters with paint, or carve through a painted face so the wood shows. A small sign takes minutes on a hobby CNC.
Below: how V-carving works, the bit, the wood and the fonts, depths and cautious feeds, finishing, the usual mistakes, and the whole job in Dusty, a free CNC app, from the example sign to the carve.
What is V-carving?
A V-bit is a cone. In V-carving, the software moves its tip along the middle of each stroke and lowers it until both flanks of the cone touch the two edges of the letter. Wide strokes go deep, thin strokes stay shallow, and the corners come out sharp, because the tip rises to the surface as it runs into each corner. That chiseled look is why V-carving is the classic way to letter a sign.
The depth is pure geometry: depth = stroke width ÷ (2 × tan(half the bit angle)). With a 90° bit the groove is half as deep as it is wide; with a 60° bit, 0.87 times its width.
| V-bit angle | Depth of a 3 mm (0.12 in) stroke | Width of the groove at 3 mm deep | Typical use |
|---|---|---|---|
| 90° | 1.5 mm | 6 mm | Large, bold letters; shallow, forgiving grooves |
| 60° | 2.6 mm | 3.5 mm | Most house and shop signs, crisp detail |
| 30° | 5.6 mm | 1.6 mm | Small text and fine detail |
Maximum depth and flat bottoms
A wide stroke would send the bit very deep. So you set a maximum depth: wherever the letter is wider than the cone allows at that depth, the bottom is cleared flat, and the walls stay sloped. Some programs hand these flats to a flat end mill (Vectric calls it a flat area clearance tool); Dusty clears them with the V-bit itself, at the stepover.
Choosing a V-bit for sign making
- 60°: the all-round sign bit, deep and crisp. Dusty’s example carves 30 mm (1.2 in) letters with one, at a maximum depth of 3 mm.
- 90°: wider, shallower grooves for big lettering; less material per stroke, so less load on a light machine.
- 30° and 20°: small text, fine borders and engraving with single-line fonts. The fine tip is fragile.
Two other numbers matter: the diameter, which limits the widest groove the cone can cut, and the tip. Many V-bits have a small flat or round one, which your software must know, or every depth is off.
Wood and fonts that V-carve well
Which wood for a CNC sign?
- Maple, cherry, walnut: hardwoods that hold crisp detail in carved text, as machine maker Makera notes. Cherry and walnut look good bare.
- Pine, basswood: easy to machine, but soft woods fuzz along the grain, especially with a dull bit, and dent under clamps.
- MDF: no grain, smooth, cheap, ideal for painted signs. Seal it before painting, and extract the dust: MDF makes a lot of fine dust.
- Plywood: fine for shop signs, but the face veneer is thin, its edges chip, and cheap sheets hide voids.
Fonts for V-carving
Bold fonts with strokes of fairly even weight carve best: they go deep enough to hold paint. Very thin hairlines and pointed serif tips get shallow, so they look faint. Script letters that touch are best welded into one outline. Single-line fonts are a different job: the bit follows the line at one depth (engraving), it does not V-carve.
Depth, passes and safe feeds on a hobby CNC
A 3018, a Shapeoko or a LongMill all carve signs, but light machines like light passes. Dusty’s V-carved sign example is set for a 3018-type CNC with values you can start from:
| Setting | Example value | Why |
|---|---|---|
| Maximum depth | 3 mm (0.12 in) | Deep enough to hold paint; bold strokes get a flat bottom |
| Depth per pass | 1 mm (0.04 in) | The tip goes down at most this much at each pass |
| Feed rate | 600 mm/min (about 24 IPM) | Cautious for a light machine and a 2-flute bit |
| Plunge rate | 200 mm/min (about 8 IPM) | Gentle entries |
| Spindle speed | 10,000 rpm | Chip load 600 ÷ (10,000 × 2) = 0.03 mm per flute |
These are starting points for a small spindle: your bit maker’s values come first. If the wood burns, the bit is rubbing (feed up or speed down); if it chatters, take lighter passes. Carve a test word on an offcut of the same board first. Our guide to CNC feeds and speeds for wood shows how to work out these numbers for any bit.
Finishing a V-carved sign
The cleanest paint fill is a mask. Machine maker Laguna Tools describes it this way:
- Cover the face with a self-adhesive stencil film and roll it flat.
- Carve through the film with the V-bit (Laguna uses a 90° bit).
- Spray the letters with shellac: it seals the end grain the V exposed, so the paint does not bleed into the wood around them.
- Paint the letters, peel the film, sand lightly, then apply a top coat to the whole sign.
Two other ways: paint or stain the board first and carve through the paint, so the letters show bare wood; or paint over the carving and sand the face clean. Sand gently: every 0.1 mm you remove narrows each stroke by about 0.12 mm with a 60° bit.
Common V-carving mistakes
- Letters too thin. A 1 mm stroke is only 0.87 mm deep with a 60° bit, and sanding takes some of that away. Use a bolder font, larger letters or a sharper bit.
- A wrong Z zero. Every millimeter of width comes from depth: with a 60° bit, a Z zero 0.1 mm too low widens every stroke by about 0.12 mm, and thin letters merge. Probe the top of the board.
- A board that is not flat. A cupped board gives letters that are fat in one place and faint in another. Flatten or surface it first.
- A worn or wrong bit. A dull tip fuzzes the grain; a 90° bit mounted where the toolpath expects 60° cuts every letter too wide. Enter the angle, diameter and tip of the bit you actually mount.
- Clamps in the way. The sign is not cut out, so clamps sit on its edges: keep them clear of the border and below the safe height.
V-carving software: what you need
Any CAM with a V-carving toolpath will do. Vectric VCarve, the sign makers’ classic, is a paid Windows program; Vectric says Macs run it through Parallels, with limited technical support. For a native Mac app, Vectric now sells Spark, for Apple silicon Macs, with V-carving and a free trial. Carbide Create Core V-carves for free, but only for Carbide 3D machines; in Easel, V-carving needs the Pro plan ($24 a month). Dusty V-carves for free on Mac, iPad, Windows and Linux, and drives GRBL, grblHAL and FluidNC machines itself; the wider comparison is in our guide to free CNC software.
How to V-carve a sign in Dusty
Dusty’s second example project, “V-carved sign”, is a 160 × 60 mm sign with a V-carved word and a border, all with one 60° V-bit. Here we change its text to PATIO and run it on the virtual CNC. The names are those of the Windows and Linux app; a few differ on Mac and iPad.
- Open the example. Install Dusty from the download page, then File › Open Example and Open next to V-carved sign (Mac: File › Open Example…; iPad: More › Example Projects…). The stock is 160 × 60 × 12 mm (6.3 × 2.4 × 0.47 in), origin at the bottom left corner, Z zero on top; the notes give the material (12 mm hardwood or MDF), the bit and the workholding.
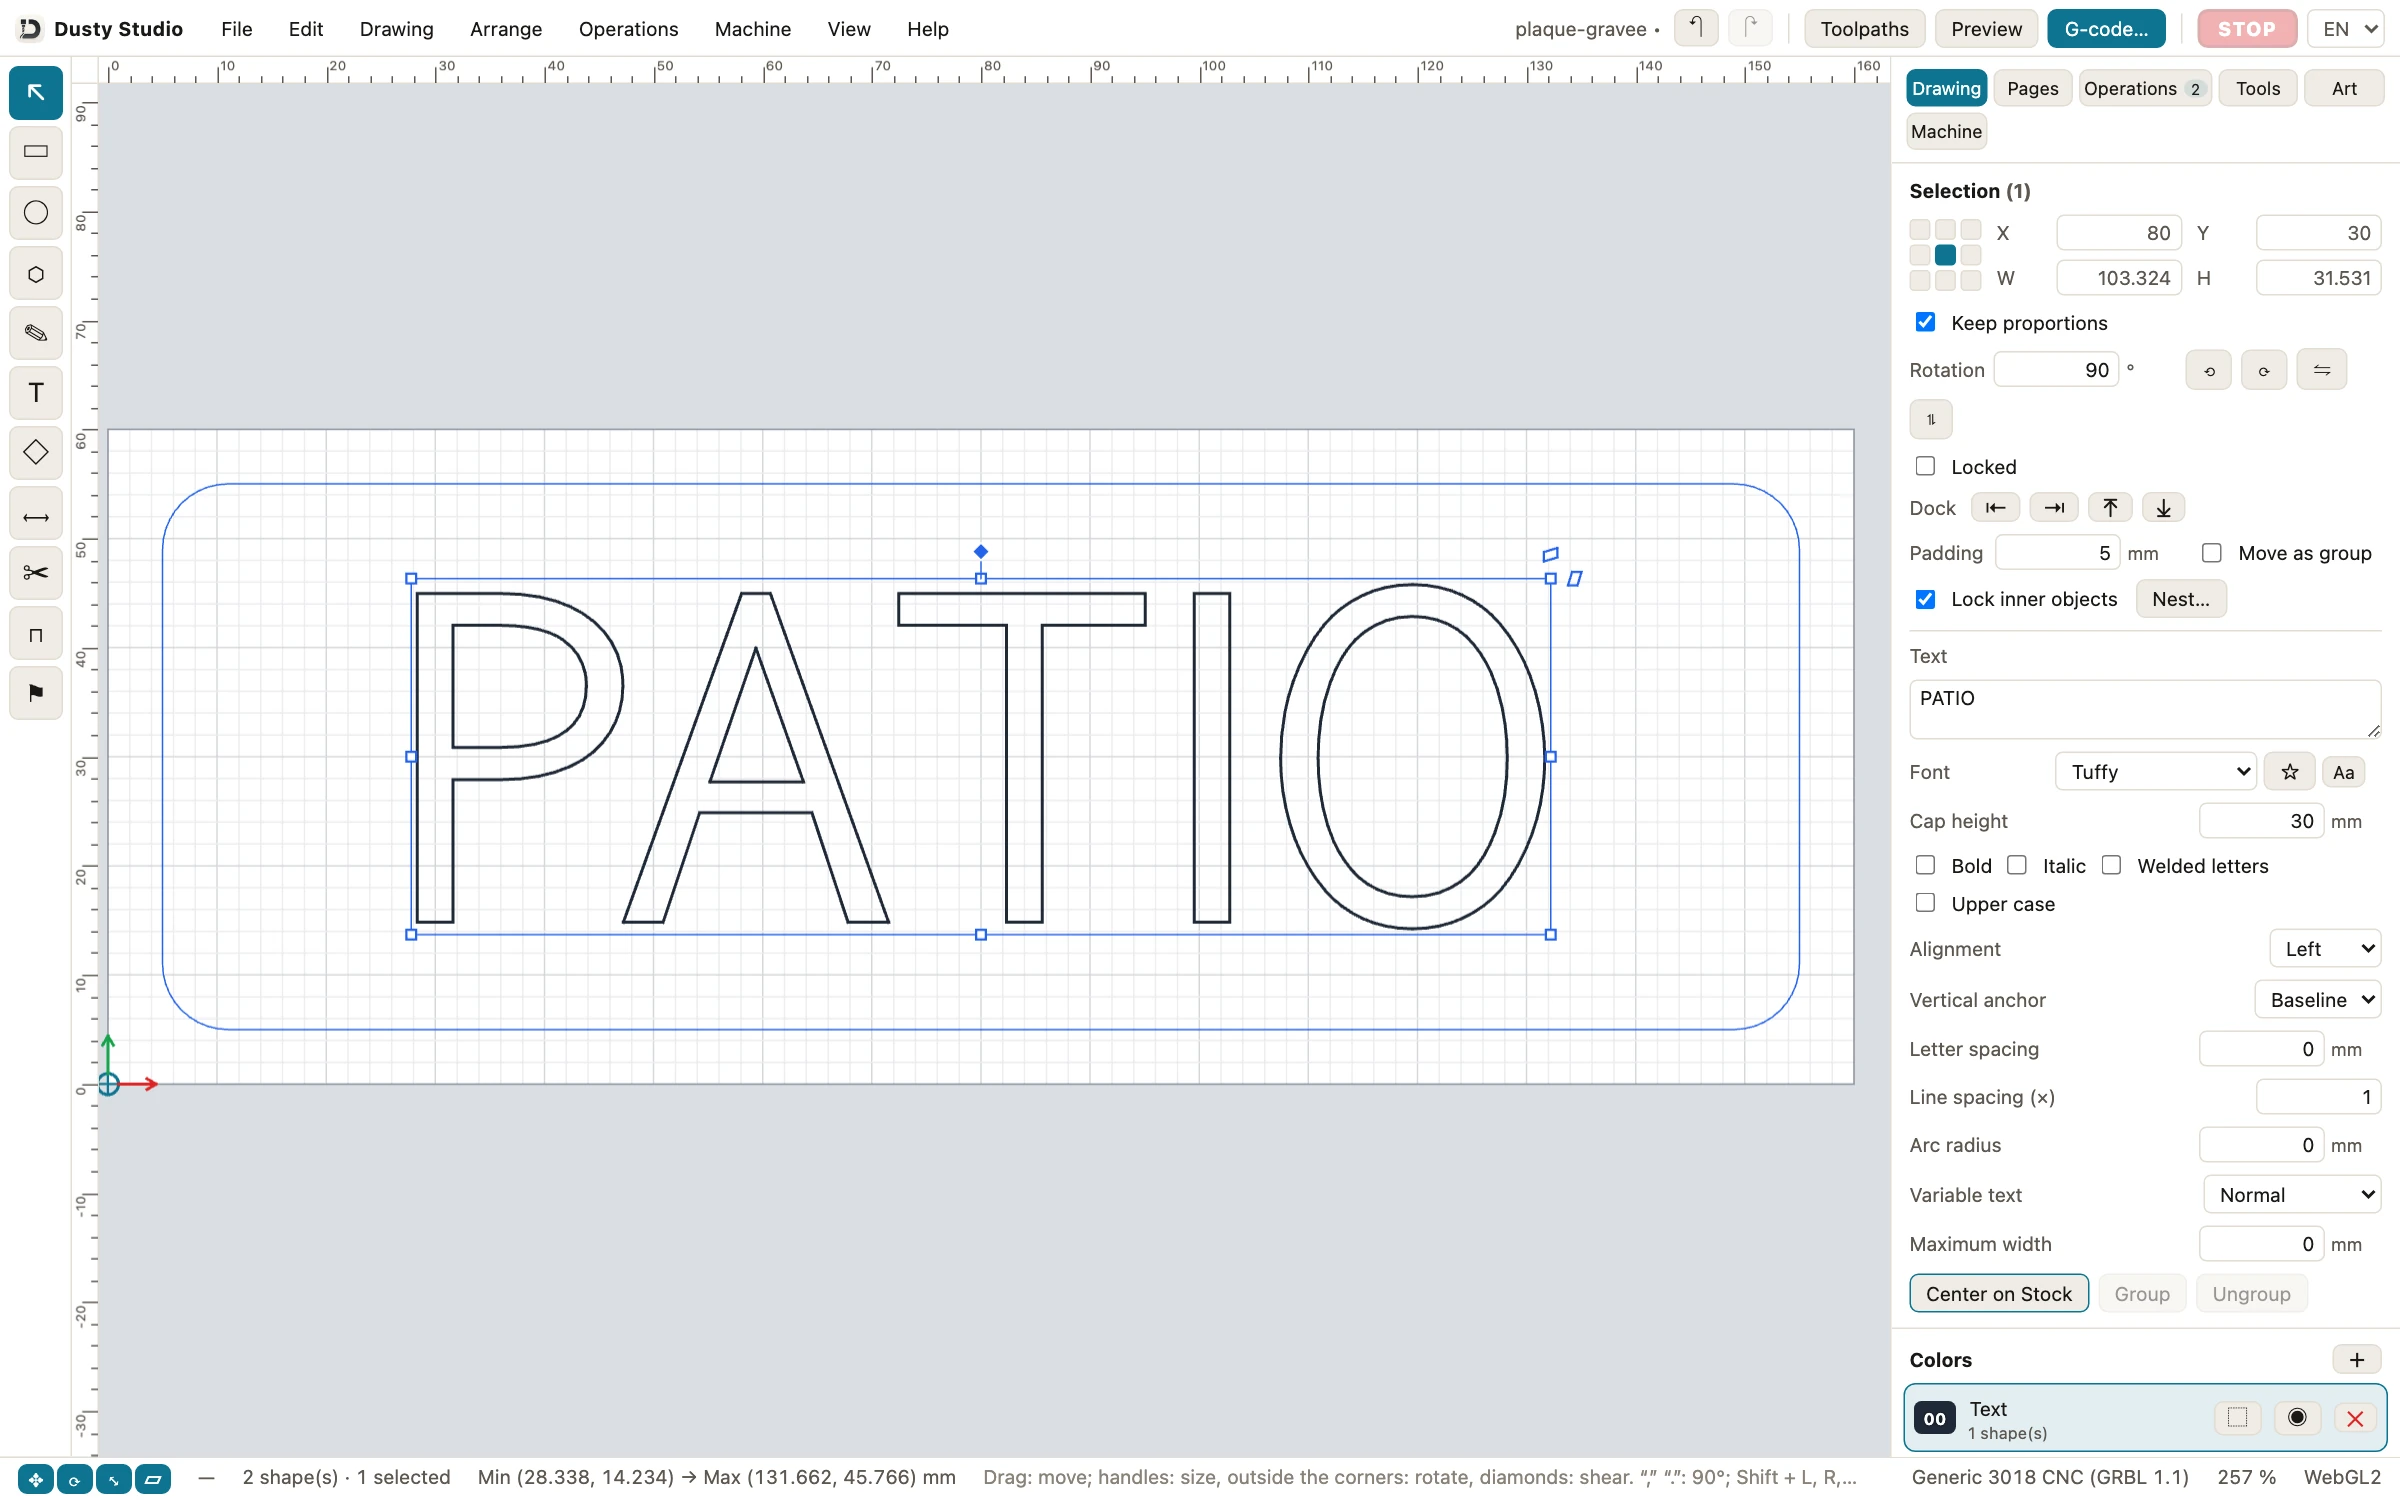
- Change the text. With the Selection tool, click a letter. In the Drawing tab, type your word in the Text box, keep the Tuffy font and a Cap height of 30 mm, then click Center on Stock. For a longer word, lower the cap height or set a Maximum width, so the word stays inside the border (see text settings).
- Check the bit. In the Tools tab, click V-bit Ø 12.7 mm 60°: Diameter 12.7 mm, Included angle 60°, Tip radius 0 mm. Enter the exact values of your bit: every depth depends on them.
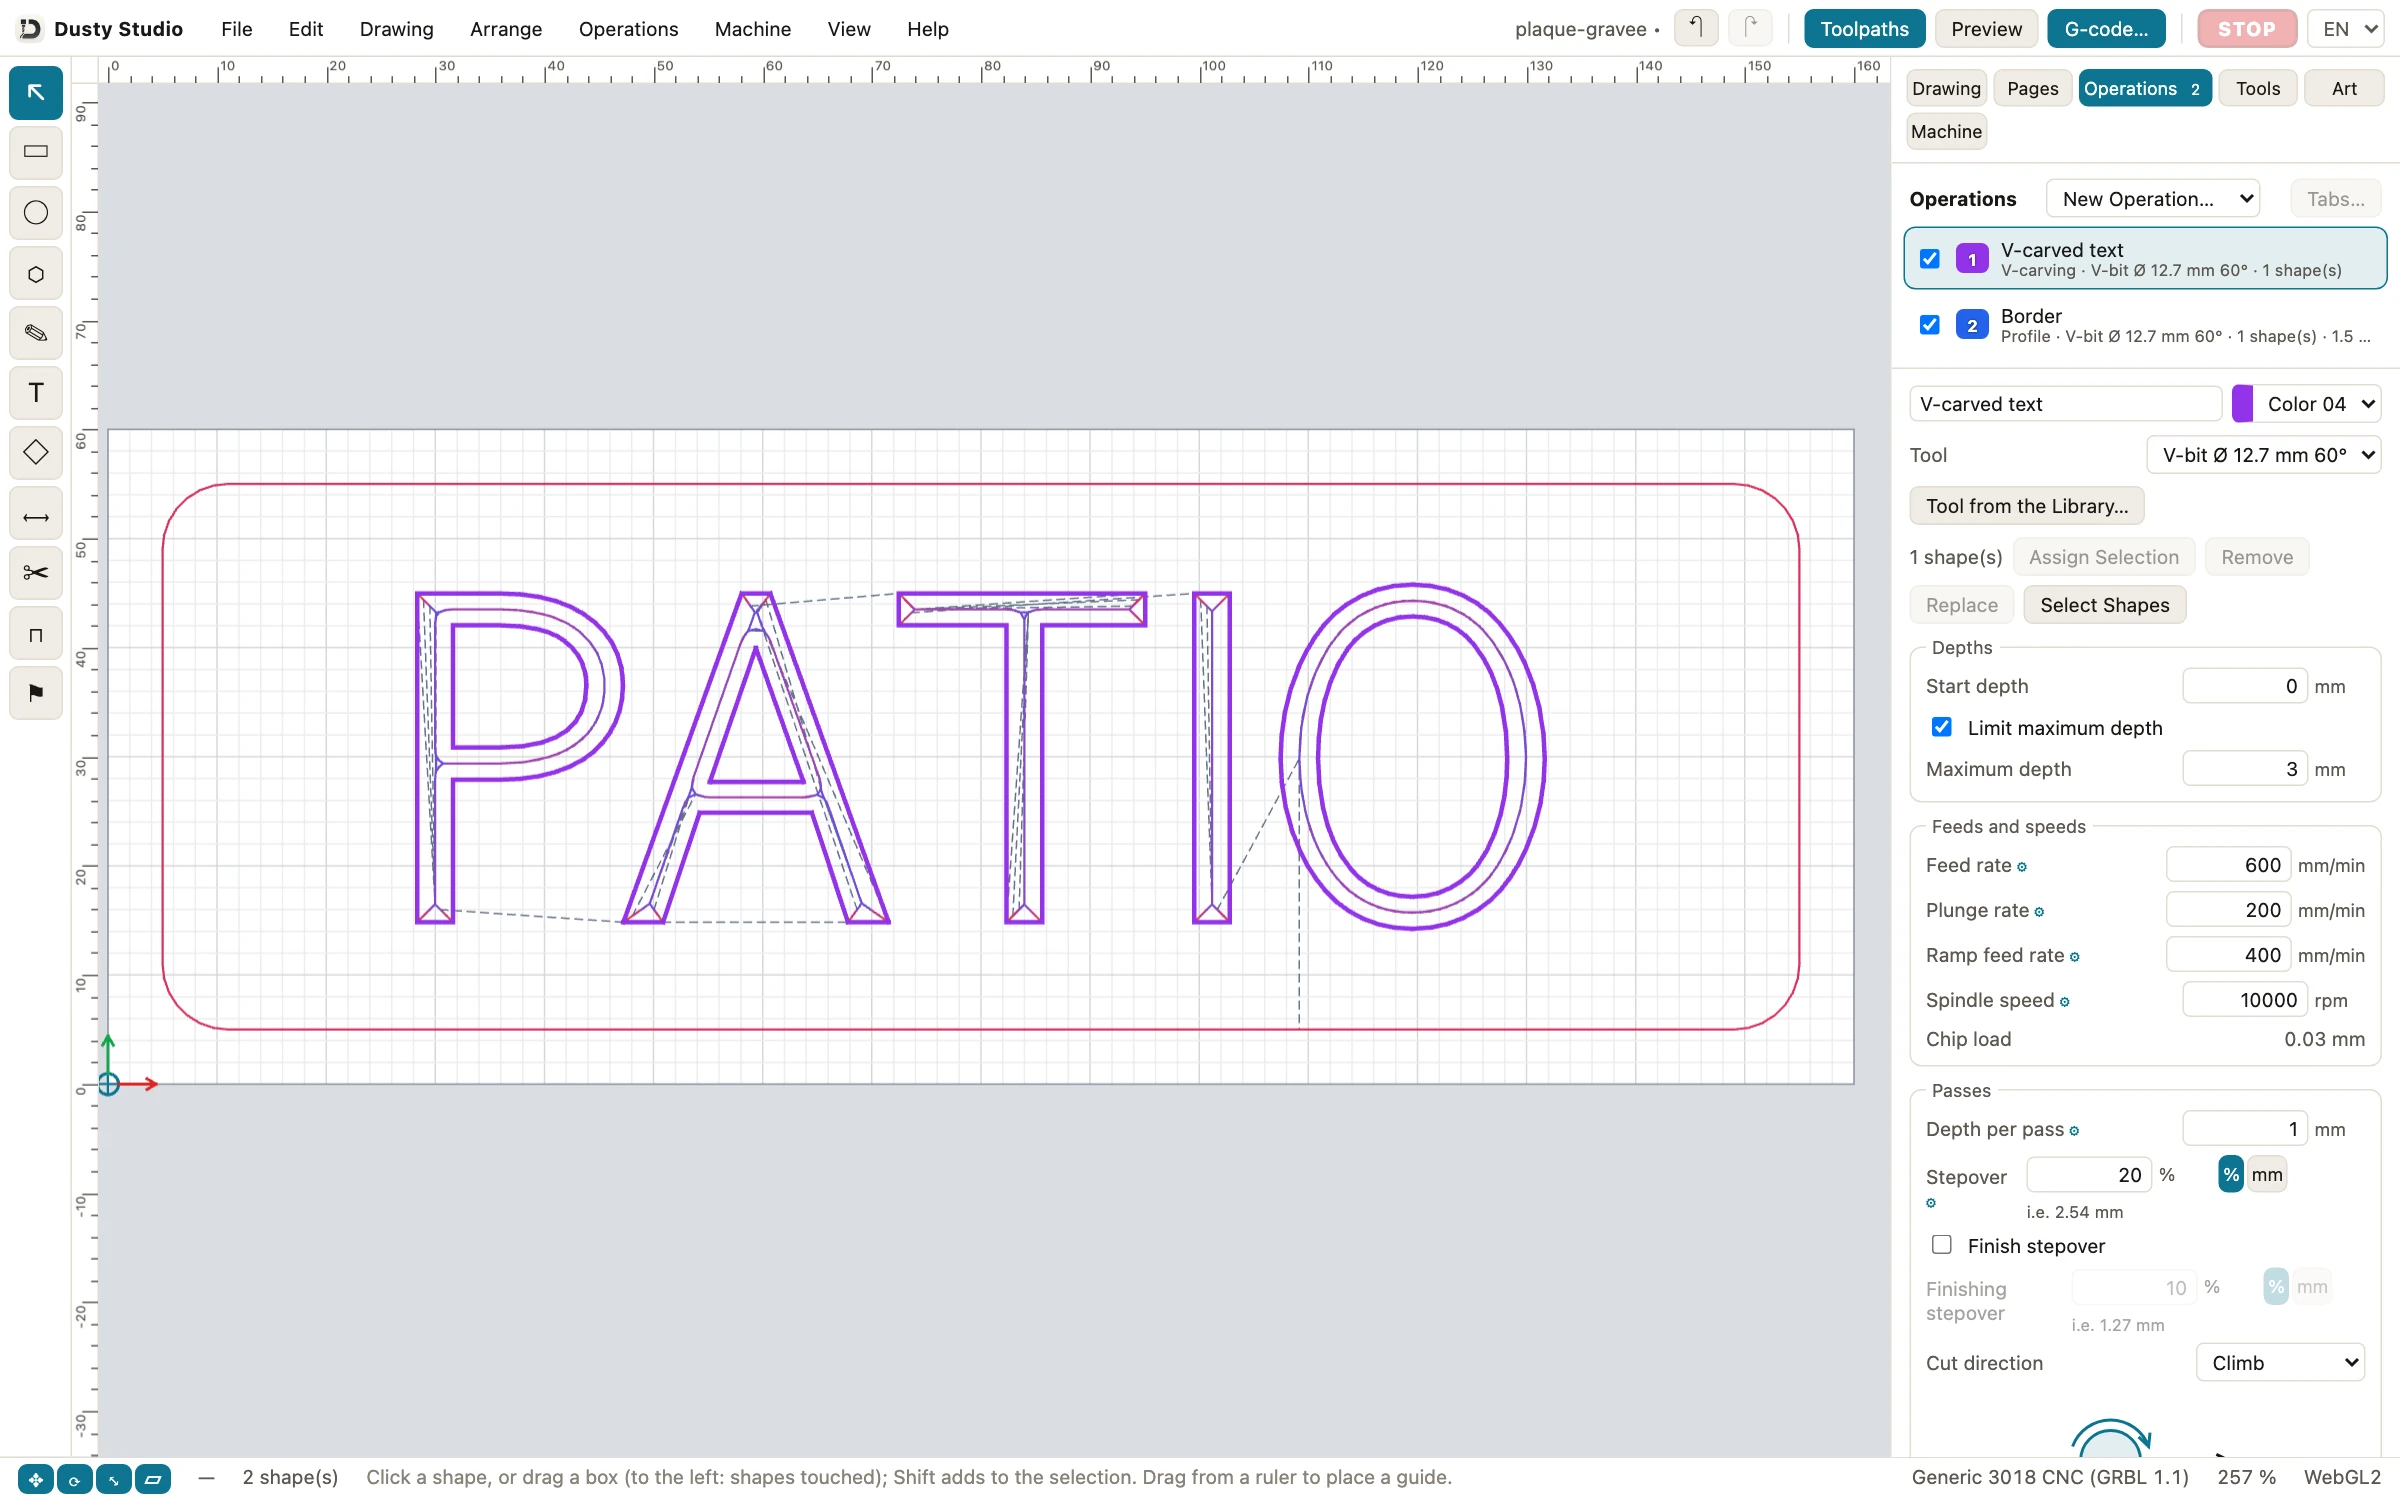
- Set the V-carving. In the Operations tab, click V-carved text. Keep Limit maximum depth checked with a Maximum depth of 3 mm, a Depth per pass of 1 mm, a Feed rate of 600 mm/min, a Plunge rate of 200 mm/min and a Spindle speed of 10000 rpm (Dusty shows a Chip load of 0.03 mm). The flat bottoms are cleared at the Stepover, 20% (2.54 mm); check Finish stepover for a smoother floor (see V-carving).
- Keep the border. The Border operation is a profile on the line, 1.5 mm deep, with the same V-bit: no tool change. Click Toolpaths in the top bar: the bit follows the middle of each stroke, in passes of 1 mm at most.
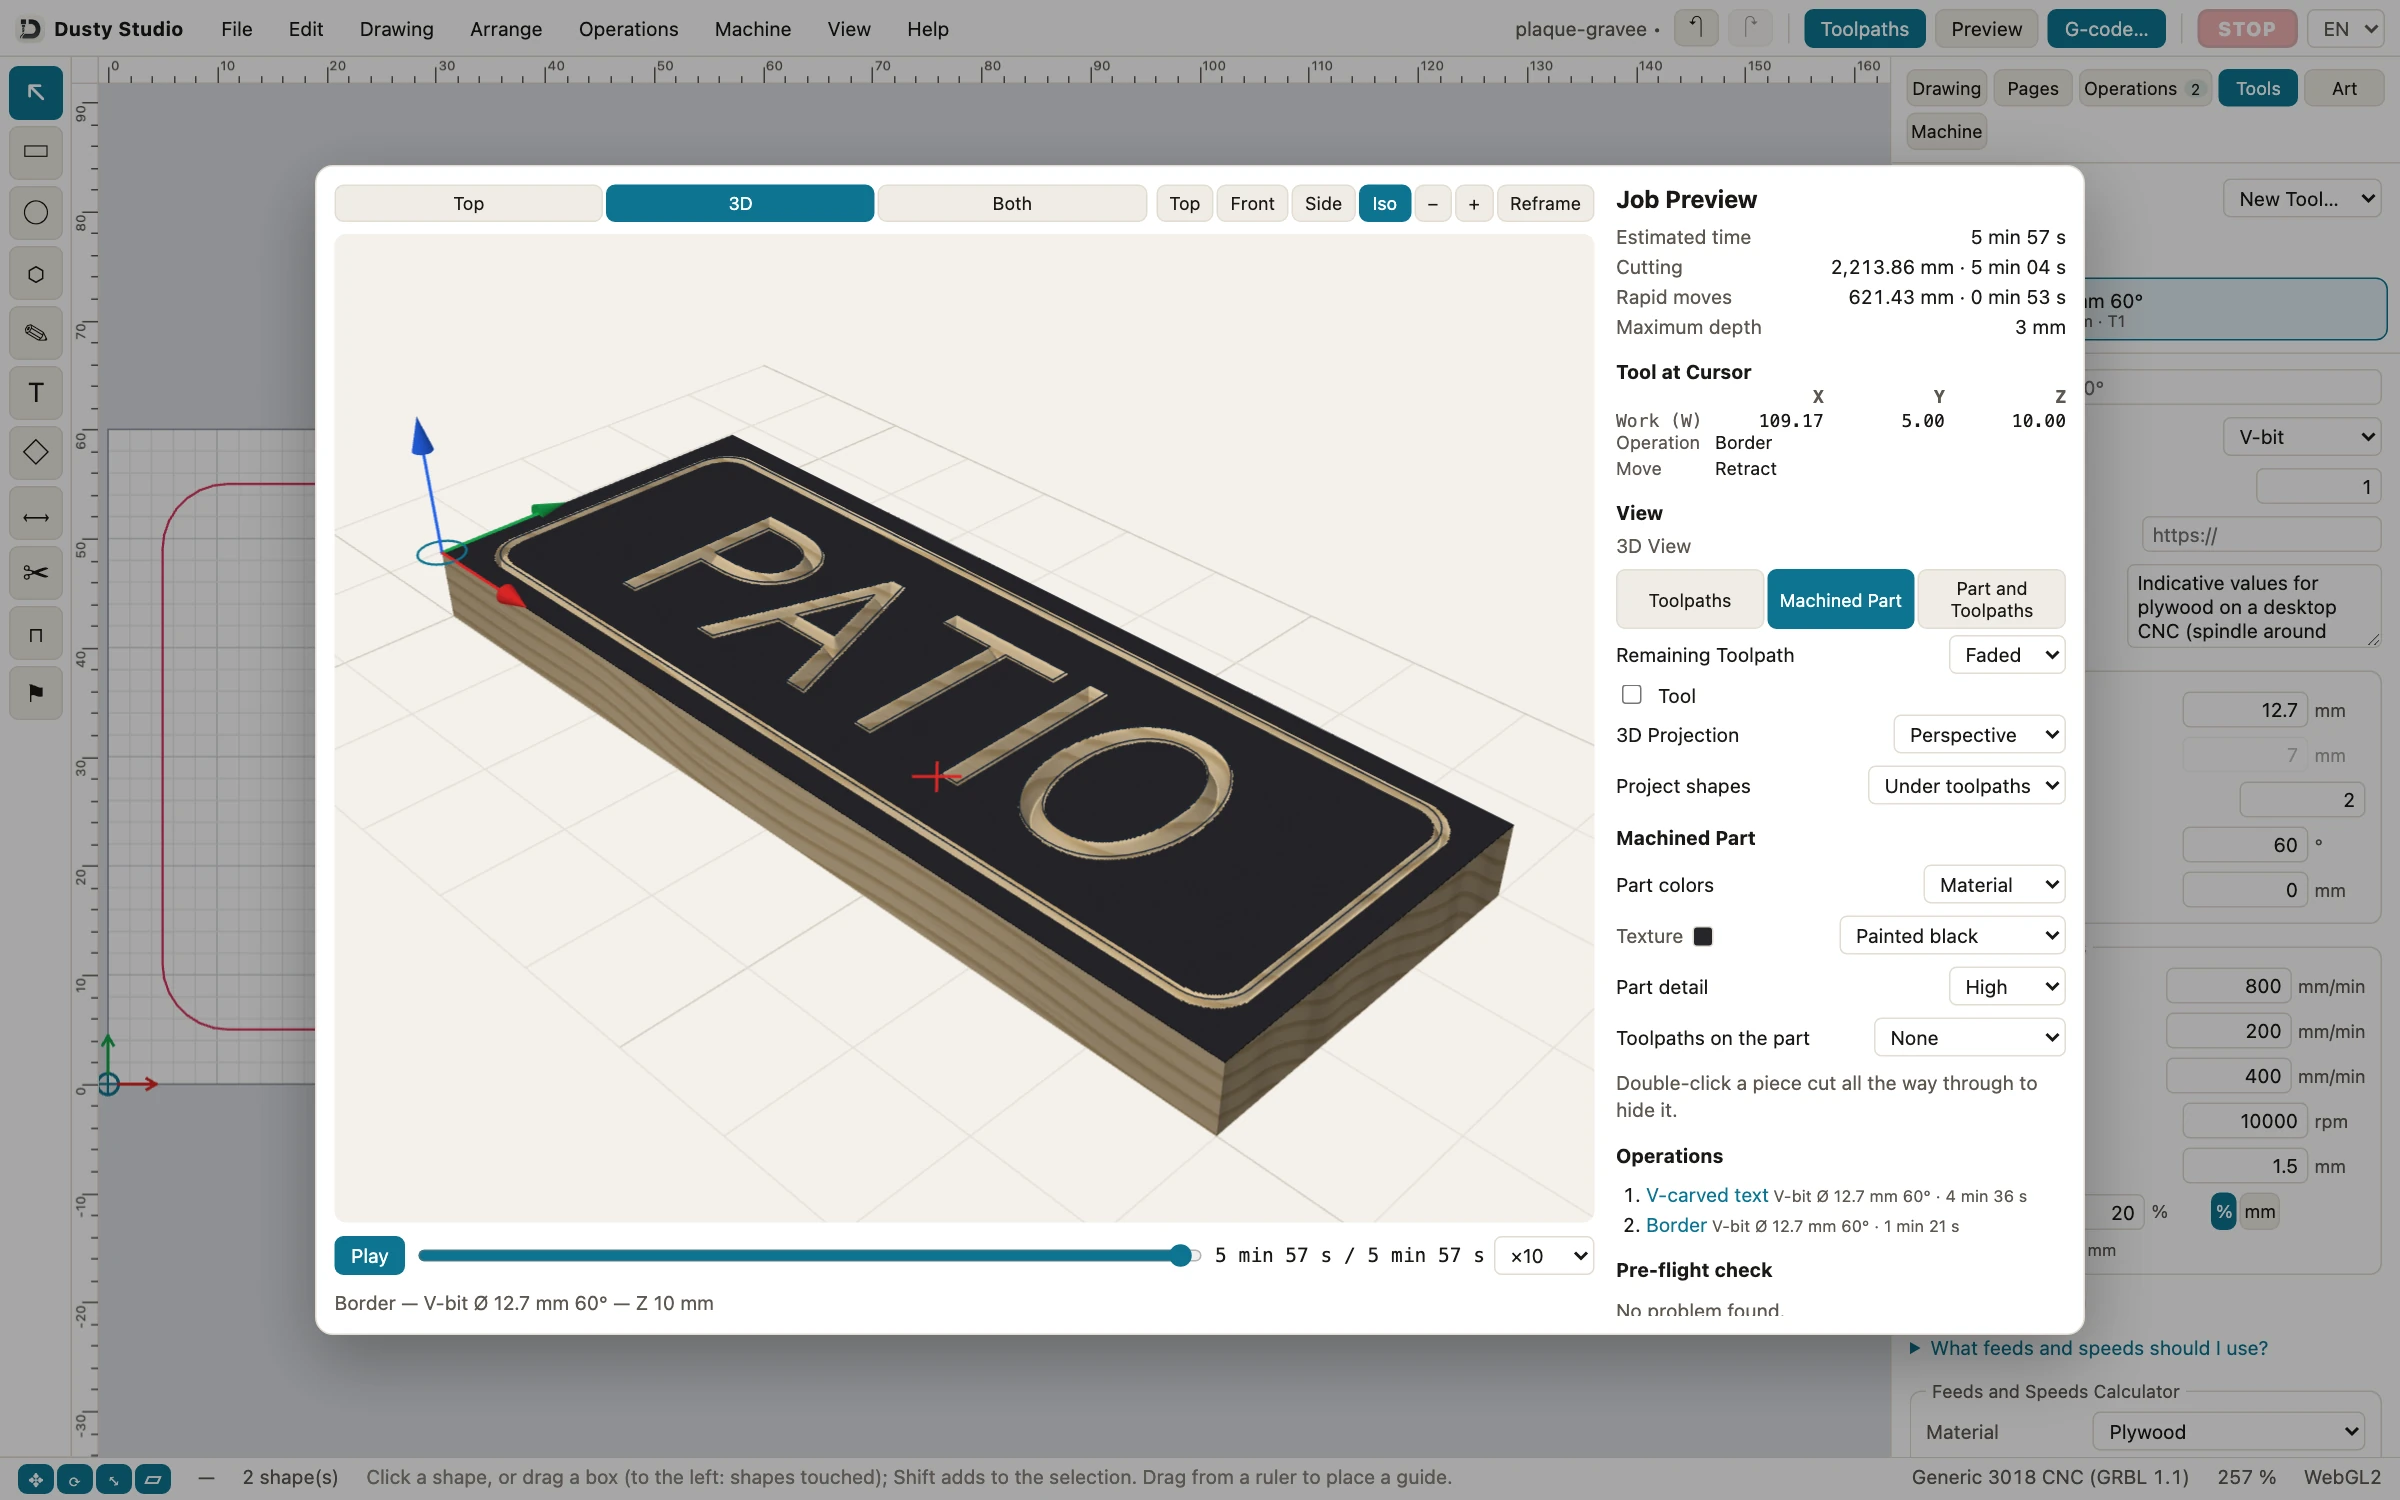
- Preview the carve. Click Preview, then Machined Part: Dusty estimates 5 min 57 s on a 3018 for the PATIO sign, at a Maximum depth of 3 mm. Pick the Painted black texture to see a pre-painted board. The Pre-flight check says No problem found; the 3D Check finds no collision and no rapid move through the material, and lists Plunge too fast warnings where the bit dives into a letter faster than its 200 mm/min plunge rate: click one to see where (see machined part and pre-send check).
- Save the G-code, if another program sends it: G-code… opens Export G-code; keep the Single file preset and click Export…. The G-code follows the active machine: by default, a generic 3018 with GRBL 1.1.
- Clamp and set the zero. Clamp the board by its edges, clear of the border and below the 10 mm safe height (see workholding). In the Machine tab, choose Virtual CNC (or USB port), click Connect, then Homing. Jog the tip over the front left corner and click Zero XY; set Z on the top of the board with Probing…, or with a sheet of paper and Z zero (see work zero).
- Frame, dry run, carve. Frame… runs around the job, Dry Run… plays it above the board, spindle off. Then Send the Project… shows the pre-send check and asks you to agree that the spindle will turn (on Mac: Start Job…). Lower the feed override to 50% for a first sign, and keep a hand near STOP.
Carve this sign, for free
Install Dusty on Mac, Windows, Linux or iPad, open the V-carved sign example, type your word and run it on the virtual CNC before the first chip. No account, no subscription.
Before you carve
- Safety glasses on, hearing protection for long jobs, dust extraction running (MDF makes very fine dust).
- Board clamped firmly, clamps outside the toolpaths and below the safe height.
- Hands away from the bit as soon as the machine can move; emergency stop within reach.
- Z zero checked on the top of the board, with the bit you will actually use.
- Frame and dry run done, first carve with the feed override at 50%.
- Never leave the machine running unattended: a dull bit can scorch the wood and hot chips can catch fire.
From the first sign to the next ones
Once the example carves cleanly, the same steps work for your own design: type the text, or import an SVG or DXF, then add a V-carving with your bit. The toolpaths page lists what else Dusty machines, and the 3D preview and checks page what it verifies. Download Dusty; if your first sign comes out right, a donation keeps it free for everyone.
Frequently asked questions
What is V-carving?
V-carving cuts letters and shapes with a cone-shaped V-bit whose depth follows the width of each stroke: wide strokes go deep, thin ones stay shallow, and corners come out sharp. It gives the chiseled look of hand-carved signs.
Which V-bit angle is best for signs?
A 60° V-bit suits most signs, with deep, crisp letters. A 90° bit makes shallower, wider grooves for large letters, and 30° or 20° bits handle small text and fine detail.
How deep should a V-carved sign be?
The depth follows the stroke width; you set a maximum. Dusty’s example sign stops at 3 mm (about 1/8 in): with a 60° bit, strokes wider than about 3.5 mm get a flat bottom there, thinner ones stay shallower.
Is there VCarve for Mac?
Vectric VCarve is a Windows program; Vectric says Macs can run it through Parallels, with limited technical support. Vectric’s Spark is a paid native app for Apple silicon Macs with V-carving, and Dusty V-carves for free on the Mac App Store.
What is the best wood for a V-carved sign?
Hardwoods such as maple, cherry and walnut hold crisp letters. MDF is cheap and smooth for painted signs once sealed; pine and other soft woods carve easily but fuzz more.
Is there free V-carving software?
Yes. Dusty V-carves for free on Mac, iPad, Windows and Linux and drives GRBL, grblHAL and FluidNC machines. Carbide Create Core V-carves for free on Carbide 3D machines only, and Easel keeps V-carving for its Pro plan.